Monday, January 31, 2011

Mercury Cyclone Altered Wheelbase Model Build

Here's one more altered wheelbase car that i built out of a stock bodied Mercury cyclone.
I did the old "cut the 1/4's and slide them forward trick" on this one just like on the 55 chevy and the GTX.
I also did the same thing to the chassis, and removed the back seat. The paint on this one is the same transparent orange that I used on the GTX, but this time I sprayed it over a silver base color. It came out a lot darker than it did on the GTX. I painted the hood flat black, and added some misc. decals.
The engine is a boss 429 from my parts box, with fuel injection. The headers also came from my parts box and I painted them flat black. To raise the front end on this car  I made a set of raised spindles and a set of chrome radius rods because I didn't have a straight axle to use. The roll bar is made out of steel coat hanger and the interior is painted flat black.
Shortly after I built this one, they re-issued an old model kit of an altered wheel base Mercury Cyclone/ Comet called "Haley's Comet". Mine is cut up from a stock wheel base kit, but it would have been much easier to just buy and build the re-issued kit.
Like the other a.w.b. cars that I built, this one was built before I started putting on fuel lines and plug wires. I built this one kid of quick, so I don't think it came out as nice as my other ones.
 We at Suede and Chrome think it looks GREAT Rob! Thanks again for sharing a few of your past builds with us...they are truly awesome!

Saturday, January 29, 2011

Another Riley Creation..."Altered GTX"

After I built the altered wheel base 55 chevy, I decided to try building another altered wheel base car.
This one is a Plymouth GTX, and I think it's a 69....I can't remember. 
On this one I did the same thing to the rear 1/4 panels that I did to the 55 chevy (cut the 1/4's off, cut a section out of the front of the 1/4's, slid them forward and used the sections to fill in the rear of the 1/4's). Then I glued the pieces back onto the body and went over the seams with bondo and sanded them smooth.
I also did the same thing to the chassis by cutting a section out and moving the rear part of the chassis forward.
This was done pretty much the same way that I did the 55 chevy as far as the body, chassis and interior go.
I had this really cool set of solid, soft rubber slicks and I really wanted to use them on something. So, In order to make them look right on this car, I had to raise the entire car up (like some of the drag cars were in the late 60's/ early 70's).
I used a chrome straight axle on the front with a single transverse leaf spring and a set of radius rods.  I moved the front axle forward but left the front wheel wells in their stock location.
The paint on this body is a gold base color, followed by transparent orange lacquer. I masked off the sides of the car and sprayed some yellow panels on it with a red pinstripe around the yellow and then clear coated it with lacquer. The interior is painted flat black and the rear seat has been removed.
The engine is a blown hemi painted orange of coarse. I painted the sides of the blower and in between the fins on the valve covers with the same  orange. The headers came with the model and I sprayed them flat white.
I left the front bumper in place on this one because a GTX looks funny with no front bumper.
My friend whipped up the decals and they are done in silver foil. I came up with the name "Chi-Town Shaker" for the car and I added some misc. sponsor decals.
I built this model back before I started putting on fuel lines and plug wires and that's why there aren't any on this one.
WOW! Rob, you never cease to amaze me brother. It's been a blast posting this stuff over the past few days. I'm looking forward to other goodies you might be sending for future posts!

Friday, January 28, 2011

Rob Riley's Custom '55 Altered

Still more from the "Mind of Riley". Today's post is a very cool Altered '55 Chevy! Thanks again to Rob Riley for sending these cool pictures and background story!
I have always liked the old altered wheel base drag cars, but no one was making any models of them anymore. You could buy resin bodies with altered wheelbases, but they are pretty expensive. I took a model of a stock wheel base 55 chevy and altered the wheelbase myself.
The first thing I did was to determine how far I would need to move the rear wheel wells forward to get the right look. After I figured that out, I cut both 1/4 panels off the body with a razor blade and cut a section out of the front of them. Using a razor blade to cut a plastic model car body is dangerous but it leaves a nice clean cut without removing any of the plastic (like if a razor saw is used). I moved the 1/4 panels forward and then used the section that I cut out, to fill in the rear of the 1/4 panels.  I moved the wheel wells forward  about a 1/2 inch. I glued the 1/4 panels and the section peices back onto the body with superglue, and then I went over the seams with bondo. I removed the side trim from the body but I left the door handles on. I also left the rear wheel wells stock instead of radiusing them out.
Once the bondo was dry and sanded smooth I sprayed the body with gray primer, a silver base color, and then candy blue lacquer paint. I put a couple of coats of clear lacquer over the blue paint.
I had to cut the chassis to move the rear axle forward. I cut a section out of the chassis right in front of the stock leaf spring mounts and moved the rear section of the chassis forward. I glued and molded the rear section of chassis to the front section of the chassis. The chassis also had a single stock exhaust molded into it so I had to cut all of it out.
Now that the chassis was chopped and the rear axle was moved forward, the interior pan would no longer fit. The rear axle was now where the back seat was at. I cut out the back seat and made a tonnue type cover to go over the back seat area. I made a roll bar out of steel coat hanger and added a single bucket seat to the front.
For the front axle, of course I went with a chrome straight axle, but I moved it forward without moving the front wheel wells forward like I've seen on a bunch of older real a.w.b. cars. I left the front bumper off, but kept the rear bumper on. At this time in drag racing, it was all about weight transfer and a stock 55 chevy rear bumper would help put some weight at the rear of the car for more traction.
In the front, I left the grill out, and in it's place I put a nice chrome moon tank. The engine is a big block chevy with hilborn injection, backed by a 4 speed. I made some new engine mounts and set the engine back a little bit. I tinted the windows with some blue film just like they did in the 60's. The fender well headers are from a Tom Daniel beer wagon model kit and they are sprayed flat white. I built this back before I started adding plug wires and fuel lines, so that's why there aren't any on this one.
 Come back tomorrow for another "altered" creation from the mind of Rob Riley.

Thursday, January 27, 2011

Barney's Bullet!

If you've been enjoying the last few days posts of custom model builds by Rob Riley, I think you will truly like today's post. I believe it's one of my favorites!
This started out as an original dealer promo model of a 1962 Ford country squire station wagon.  Nice, complete original dealer promo models from the 60's can be expensive and kind of hard to find. I picked this one up off e-bay for about $10.00. It was mostly complete except for the windows, and the rear bumper, but it had seen better days.
I am a big fan of "The Andy Griffith Show" and I had this crazy idea.... what if Barney Fife had a drag car, and this is what I came up with.
The first thing I did was cut a hole in the hood for a blower to stick out. These promo models don't have engines, and the hoods are molded closed. So I cut the hole and built a box under the hood to sit the blower on. I angled the box slightly backwards so it looks like the engine is set back just a little. By making a box on the underside of the hood, it makes it look like there really is an engine in it because the blower is sitting down inside the hood rather than just on top of the hood. I added fuel lines to the injector and a Hilborn style scoop.
I sprayed the body gloss white, and then I masked off the hood, front fenders rocker panels, 1/4 panels and tailgate, and sprayed them gloss black.  I sprayed a couple of coats of clear lacquer over the whole thing. I detail painted the window trim, side trim, door handles and bumpers with silver paint. I had my friend whip up some custom door decals from pictures taken right off of the actual Mayberry police car used in The Andy Griffith show. 
I made the red "gumball" roof light out of some parts that I found in my parts box. The interior is painted flat black and is pretty basic. I made the windows out of a clear plastic folder cover.
I used the chassis that came with the promo model, but I had to modify it slightly because it was a little warped from age. (This model was made in 1962, and it's probably been through a lot over the years.)
I sprayed the chassis flat black and I added a set of chrome leaf springs to the front, with a straight axle. I also added an oil pan to further make it look like there is an engine in the car. The rear axle was molded into the chassis so I just left it as it was, and I put on a set of skinny, 60's style slicks.  The rims are some old style Radir 5 spokes, and I widened the rear ones.The fender well headers came from my parts box and I sprayed them flat white.
I had my decal making buddy come up with some pretty funny sponsor decals based on things found in Downtown Mayberry (Walkers drug store, Emmet's fix it shop, Wally's filling station, and Floyd's barber shop.) Barney would need a pit crew so, he came up with Andy Taylor as the crew chief, Aunt Bea and Thelma-Lou as crew members. Opie Taylor started building race engines, so of course, he is Barney's engine builder. I named the car "Barney's Bullet" for obvious reasons. Above the driver's door and passenger door the decals say "Driver: Lead-foot Fife".
If you look close at the moon tank mounted on the front bumper, you will see that it has a decal "XXX" on it. Don't think for a minute that I left old Otis the drunk out of this one, because the "XXX' on the moon tank is where Otis has been hiding his hooch. Just like on the real show, the booze is right under Barney's nose, but yet, he still can't find it.
And of course, Barneys favorite saying is right there on the tailgate for all of his competitors to read as he's blowing their doors off.
This was a really fun one to build. I did get an earful from a couple of the model car purists out there because I cut up an original 60's Ford dealer promo model. HA! It's just plastic, and what fun is a car that's stock anyway?

Wednesday, January 26, 2011

The Fonzi Dragbike!

Another installment of "Models by Rob Riley".


Here's a really fun one that I built a few years ago.

This started out as a model of Fonzi from happy days with his Triumph 500 motorcycle. (There is a picture of the model kit box attached). the second picture of the bike does not show the triumph tank decals because I hadn't put them on it yet.
 
This kit was made for only one year in 1976 by MPC, and they are pretty difficult kits to find these days.
I picked this kit up off of e-bay for like $7.00 and it was in VERY bad shape. It had been built and then taken apart at some time, but it had glue all over it, and had a few broken parts, and some parts were missing.
I have no idea what scale this bike is, and it's an oddball size. It came out to be about 8 inches long after I raked the front end.
 
I chopped the front of the frame to rake it out, and I lowered the whole bike. The frame was in pretty good shape but it had a lot of glue on it when I got it. I had to sand and smooth out the entire frame and fill some areas with bondo.
 
The gas tank had the "Triumph" emblems molded into the plastic, but there was so much glue on the gas tank, I had to sand off the emblems to get all of the glue sanded down.
 
 
I painted the gas tank with silver and then clear coated it because on Happy Days, Fonzi's bike had a silver tank. I made a set of "Triumph" logo decals to go back on the tank.I made a set of drag bars out of some steel coat hanger rod, and I also made the drag pipes out of steel coat hanger.
 
I chopped the rear fender and made a brace for it out of flat plastic. I left the front fender and all of the lights off since it's now a drag bike. The bottom part of the seat is made from the license plate that came with the bike, and it says "FONZ" on it. The pad on the rear fender is the passenger seat pad that came with the kit.
The front tire is a rubber o-ring for a Caterpillar diesel water pump, and the rear slick is made from rubber gas hose. I painted the frame and engine black to keep it simple. I painted the fins and the heads on the engine silver to make the engine stand out a little bit. I added fuel lines, throttle cable, brake lines and a clutch cable. I moved the foot pegs back to the rear axle along with the shifter and the rear brake pedal. I added a set of wheelie bars that I found in my stash of parts. 
 
 
The engine only has one carb on it, which was molded to the cylinders. I put a chrome velocity stack on the carb. If i had 2 motrorcycle carbs that were this scale I would have chopped off the single carb and put dual carbs on it.
 
The Fonzi figure was wearing a striped T-shirt for some reason, and the stripes on his t-shirt were molded into the plastic. Everyone knows that the Fonz always wore a white t-shirt under his leather jacket. So I sanded down his shirt to remove the lines for the stripes. I painted his t-shirt flat white, and his leather jacket flat black. I mixed up some blue and black paint and painted his pants with it. I mixed up some tan, brown and pink for his face and hands, and then did all the detail painting. (eyes, eyebrows, lips, hair, and the zipper on his jacket.) His boots got painted flat black.
 
I made the brick wall on the computer and used  Microsoft paint with the airbrush tool to add the graffiti to the wall. I wish I had some more and better pictures of this one. I ended up selling this on e-bay, and it went  for over $100.00.
 
Excellent! Once again Rob you have created a truly "Suede and Chrome worthy" model. Thanks again for sending me these pictures and story!
Well, readers, we are not finished there! Rob has sent me a few more descriptions and pictures of some of the cool models he has built over the years. Make sure you come back in the coming days for more of  Models by Rob Riley".

Tuesday, January 25, 2011

The Exterminator by Rob Riley

I received such positive feedback the last time I posted some of my friends "builds" that I asked him to send me some more! The following contains pictures and commentary of a very cool custom model build by Rob Riley. Thanks Rob for sending me this story to share on Suede and Chrome

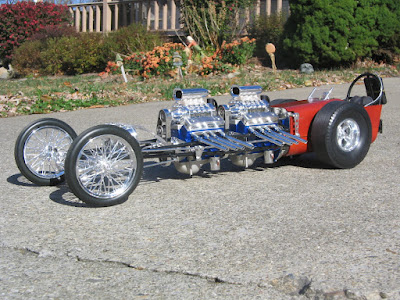
I built this one in October of 2010. This is a 1/8 scale, twin engine slingshot dragster called "The Exterminator".
 
It's about 26-27 inches long. The engines are based on Ford Y blocks. I built this pretty much right out of the box with the exception of the rear wheels, and the aluminum butterfly steering wheel. I drilled out the ends of all the headers to make them look more real, and I also sanded down the slicks.
The back rims came from an 1/8 scale T-bucket kit, and I widend them to fit the slicks better. It  has fuel lines, plug wires, brake lines, parachute lines, and seat belts. The steering is functional and you can turn the front wheels by turning the steering wheel. The rear end is a functional quick change with gears inside. The rear engine has an electric motor inside that turns the crankshafts of both engines, which makes the blower belts and pulleys spin. It even has a working clutch with a clutch pedal so when you turn the switch on, the engines turn, but the clutch keeps the back wheels from turning. When you engage the clutch, it send the power from the engine crank shafts through the clutch  to a very short drive shaft which spins the gears in the quick change rear end. The axles then turn which causes the car to move.

It's actually a pretty cool set up, but most of the time the electric motor is not powerful enough to make the car move. I have gotten it to move one time and I think one of the gears in the rear end is slipping on it's shaft or something. The chassis is painted metallic black lacquer and clear coated. The engines are painted metallic blue lacquer, and the body is metallic orange lacquer with clear lacquer over it.

This kit comes with parts to build it as a single engine dragster with either a top mounted blower, a crank mounted blower or 6 Stromberg carbs. It comes with full body work to cover the front of the chassis, but it only fits if you build it as a single engine car.

If it's built as a twin engine car, your only induction options are the top mounted blowers, but you can swap out the injection for 3 strombergs per blower. It also comes with 2 different front wheel and tire options, either spokes and skinny tires (like I used) or some 8 spoke rims with slightly wider front tires. I hope you like this one.

Rob...we do LOVE it! Thanks for sharing. Readers, if you thought this build was cool, you'll want to come back in the next few days as Rob has sent me some more really cool stuff.

Monday, January 24, 2011

Service Stations from the 1920's

Well, I've finally done it! I've finally went through all of the pictures that I took at events through the fall of 2010. I'll be looking for cool stuff to post in the next couple of weeks, but don't worry. Our car club plans to head to the Indianapolis World of Wheels the second weekend in February. And you can bet I'll be taking lots of good pics...especially in the Motorama 1963 area hosted by the Indy Road Rockets!

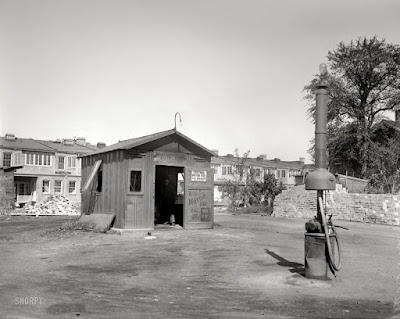
Thought I'd post some really cool pictures that a friend sent me. These pictures were taken back in the 1920's...back when they were called "SERVICE" stations! Very cool stuff...hope you enjoy them as much as I did.


Sunday, January 23, 2011

Virtual Wrenchin'

Well, as most Suede and Chrome readers know, many gearhead types always have a project or two that they are working on at any given time. For me, not only am I always continuing to make improvements to the Nifty Fifty, but I'm also always working on improvements to this site. That passion for both automobiles and digital design has given me the opportunity to meet lots of kool folks over the years, as well as work on a few projects for others.

One such project currently in the works is a business website for The Sketch Pad in Cincinnati, Ohio. Owner and operator, "Taz" Henschen specializes in everything from logo design, screen print apparel, pinstriping, low brow art, glass etching, and wall murals. I met "Taz" several years ago at the "Ducktail Run" in Gas City, Indiana. Since that time, I've run into him at various events across the midwest, and my wife and I had an opportunity to visit his shop for his Open House and Rat Rod and Rust Queen Calendar Release Party last fall.

Taz's "Voodoo Trucker" Chevy pickup

 
Examples of Sketch Pad work
Keep watching for updates on this project in the coming weeks! If you are interested in a website for your business, Let's talk! send me an email for more information.

Here is the link to the site...Let me know what you think!
www.sketchpadonline.blogspot.com

Saturday, January 22, 2011

Vintage Torque Fest 2010 DVD

I'd like to start today's post by publicly thanking John Well's of Vintage Torque. Having met John, and having read articles, websites, and watched a few of Vintage Torque videos, I knew all about his daughter Hannah's heart condition, and the surgeries that she has had and that she will most likely be facing in the year's to come. (see:  http://p4.hostingprod.com/@vintagetorque.com/hannahsheart.html for more about Hannah). I applaud John's efforts to organize the Vintage Torque Fest with proceeds being used to help cover Hannah's medical expenses. We at Suede and Chrome certainly keep John, Hannah, and family in our thoughts and prayers.

I'd like to thank John for HIS heart however. When he learned of my 19 year old son's heart surgery, and the fact that he was a "gearhead" and would be laid up for a few weeks after his surgery, John sent a few Vintage Torque DVDs to my son to help him pass the time in bed. Since that time, my son has made a fantastic recovery and was released by his heart surgeon last week. Thanks John! We really appreciated your thoughtfulness! God Bless!


(Of course I sat and watched all the videos with my son while he was recovering! One of my favorites, was the event coverage of John's own show, The Vintage Torque Fest.)

This coming year's Vintage Torque Fest is scheduled for April 30, 2011 at the Jackson County Fairgrounds in Maquoketa, Iowa. The event will include: Dirt Track, Live Bands, Swap Meet, Camping, Art Show, Model Contest, Pre Party April 29, Pre '65 Traditional Hot Rods and Kustoms, and Pre '75 Choppers and Bobbers. For more information about John's event, check out www.vintagetorquefest.com

Friday, January 21, 2011

MG and the Gas City Three

First of all, I'd like to wish my beautiful wife of 24 years a very Happy Birthday today! I love you honey!

And speaking of my wife. She and I had an opportunity to check out a "local" Rockabilly band the other night in Muncie, Indiana. I want to thank MG and the Gas City Three for contacting me via email before the show. They sent me an inquiry email asking about booking them for one of our car club's (The Righteous Rodders) car shows.

Well, when I checked out their Reverbnation page, (see: http://www.reverbnation.com/mggascity3 to hear them) I was immediately impressed. And when I saw that they had an upcoming show at the Heorot in downtown Muncie, I decided what we just had to go and check them out.

Well, we got to the Heorot at the 9 pm advertised time, but learned that their were actually 3 bands on the bill that night, "Rale", "The Elixirs", and then MG & the Gas City Three. Back in my younger days I would have had no trouble hanging out to we hours of the morning, listening to 2 skate punk bands, and then a Rockabilly band on a Saturday night. However, being "more mature" now, the thought of waiting through 2 punk bands wasn't high on my list. The opportunity did give me a chance to meet all the band members and spend some time talking with upright bass player Mike Lindsey. The guys seemed to be a great group with a real passion for music and cars. 
As fate would have it, my wife and I were invited across the street to CenterStage by a car buddy of mine. Seems he's buddy runs the place, and he has been helping him with the joint. When he told me that "The Easy Leis" - a local vintage surf guitar band was playing @ 10 pm (editors note: The Easy Leis are booked to play our car club's 2nd Annual Wheels for Williams charity car show on May 14, 2011 in Losantville, IN), we thought we would head over and hear some great surf music, while we were waiting to hear MG and the Gas City Three.

Well, we ABSOLUTELY enjoyed the set we were able to hear from the Easy Leis, and had an opportunity to talk with Nathan Reese, guitar player for the band after their set. We also would like to thank our friend Yancey and the crew at CenterStage for their hospitality.

Well, to make a long story short, we went back across the street to the Heorot at about 11:30 pm, however, "The Elixirs" were still on stage and it didn't look like MG and crew would be going on until after midnight. I'd like to thank the guys from MG and the Gas City Three for giving me a demo CD. My wife and I enjoyed listening to it all the way home. It contains some great covers of Carl Perkins' classic "Blue Suede Shoes", Johnny Cash's "Folsum Prison Blues" and "Big River", Chuck Berry's classic "Maybelline" and a song I hadn't heard in years, T.J. Red Arnall's "Cocaine Blues". 

I was so impressed with the band that I'm hoping that the Righteous Rodders can book them for a future show. For more information about the band, you can check out one of these sites:
http://www.gcity3.com/
http://www.facebook.com/pages/MG-the-Gas-City-three/158251514200239

If you live in the greater Indianapolis area, and would like to hear MG and the Gas City Three live, they will be playing on Friday, February 11th at the Indianapolis World of Wheels on the Indiana State Fairgrounds.

Thursday, January 20, 2011

Vintage Torque: 2010 Hunnert Car Pileup Video


WOW! John Wells and his crew hit the nail on the head with great video coverage of what was in my opinion the "BEST Hunnert Car Pileup EVER". After overcrowding issues in Morris, IL. last year (to the point of being closed down by the Illinois State Police), The Chrome Czars made the decision to move the 9th Annual Hunnert Car Pileup to the grounds of Progress City in Decatur, IL.

The move was embraced by Decatur and several pre and post show events were scheduled. The results, top off with BEAUTIFUL weather, resulted in a FANTASTIC event!!!!

This is the second year that I've had the opportunity to attend the event, and the second year that I've been able to get a copy of the Vintage Torque event DVD. Coming home and trying to describe the event to family and car club brothers is a really difficult task. Instead, what I do, is say, "Brother, you need to watch this video!" Typically, I'll give them the video to watch, then have to BEG to get it back! hahaha

Those of you that are regular readers of Suede and Chrome know that I try to get to a lot of local events in the Indiana/Ohio area. Then, I try to schedule a few longer trip events throughout the car show season. The Hunnert Car Pile up is one event that I plan to keep on my calendar. In my mind, it's one of the best annual events in the Midwest United States, and Vintage Torque has done a GREAT JOB of capturing the "feel" of the event on video. Therefore, I'm giving this video the Suede and Chrome "5 Wrenches of Approval" label!
To order your copy of the 2010 Vintage Torque Hunnert Car Pileup DVD, or to check out the wide selection of other cool Vintage Torque Videos, check out the Vintage Torque website at: www.vintagetorque.com

Wednesday, January 19, 2011

Last Post from the 8th Annual Blanket Run

Lots more cool from the Jerry Baker stop on the 8th Annual Blanket Run in today's post. Jerry has restored some amazing stuff. One such project is picked above. The yellow salt flat F Class Streamliner was restored by Jerry, and then he was asked to bring it out to Bonneville for an anniversary celebration. There he got to meet the original builder and take the car out on the flats.

He also had some pictures of a Bugatti that he is currently restoring. The car itself is currently touring "in progress", but he still has 3 of the four fenders to fabricate and some other metal work to complete.